How to Press Flowers: 6 Steps for Better Color
A complete at-home pressing method for turning meaningful blooms into framed pieces, cards, bookmarks, and other flat keepsakes.
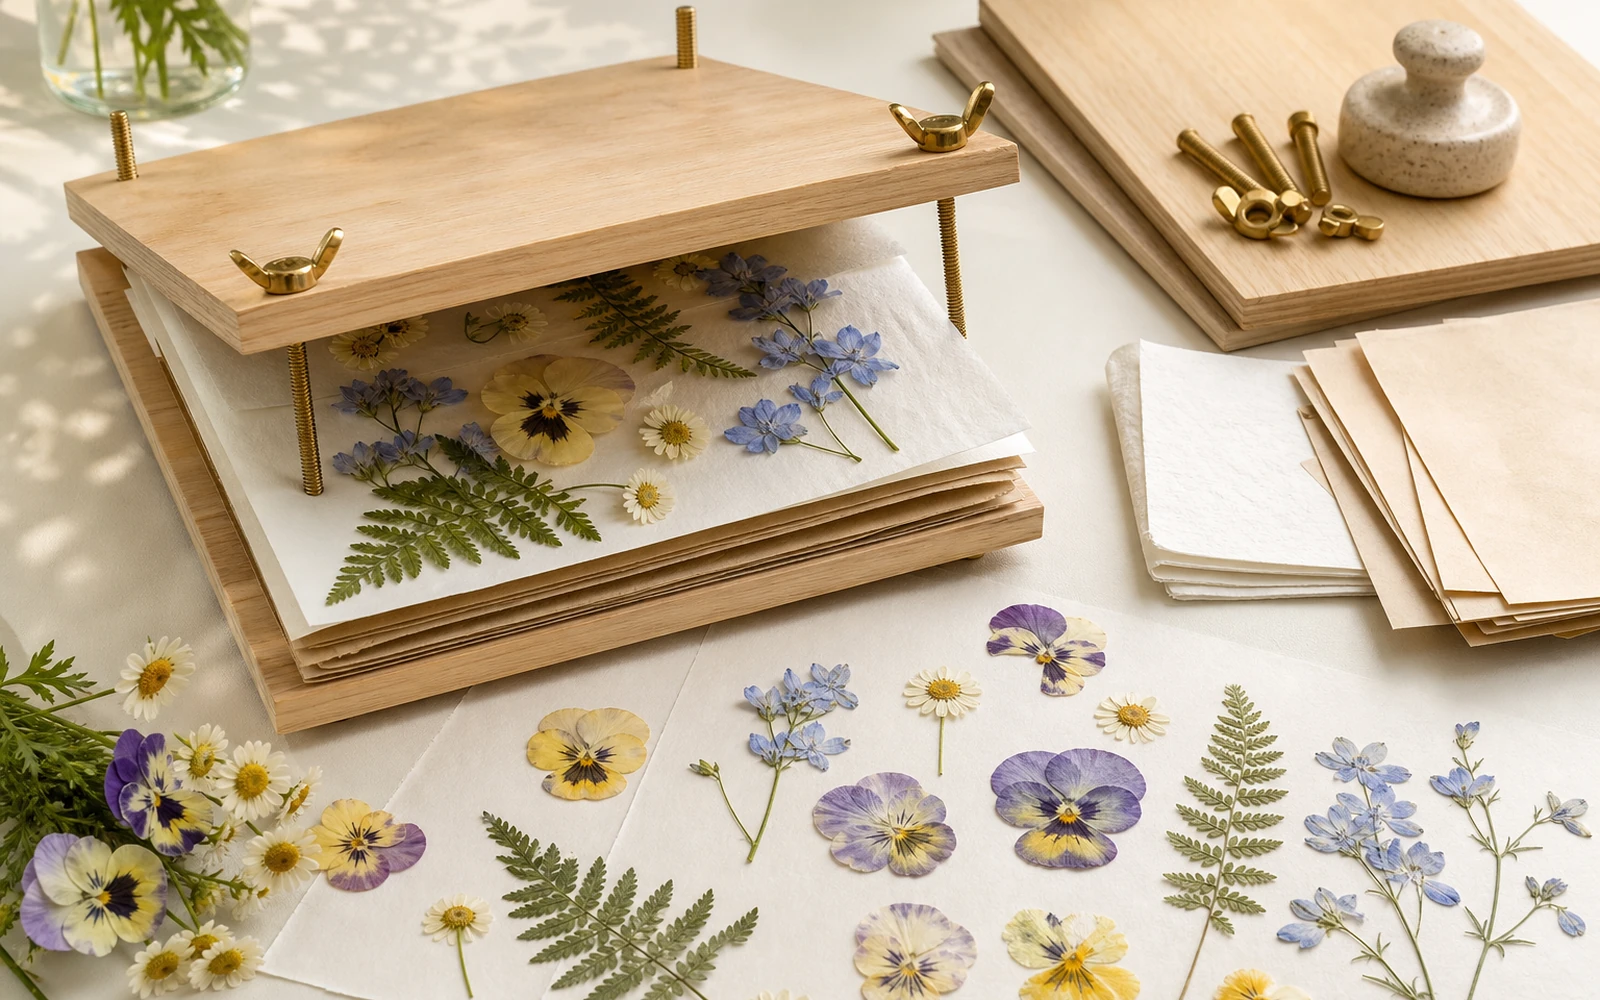
To press flowers, place dry, sound blooms between smooth absorbent sheets, arrange every petal before adding broad, even weight, check the paper after one week, and let the flowers dry for roughly two to three weeks. Start just before the bloom reaches its peak, use naturally flat flowers whole, and separate thick flowers into petals or slimmer sections. Those choices give you a better chance of keeping recognizable color and a clean silhouette—although every pressed flower becomes flat and changes with time.
This is the method for flat preservation: framed flowers, cards, bookmarks, invitations, lockets, and paper keepsakes. If you want a bouquet to remain three-dimensional, compare the options in our guide to drying flowers at home instead.
If you are choosing fresh flowers with a future keepsake in mind, browse Rosa Fiora bouquets. I would look for a design with a mix of slim flower faces, expressive petals, delicate foliage, and a card or ribbon worth preserving beside them.
What you need
Gather everything before you take the bouquet apart:
- fresh flowers and foliage that are dry to the touch;
- smooth absorbent paper, such as plain printer paper or untreated blotting paper;
- two pieces of flat cardboard for each packet;
- a heavy book plus additional flat weight, or a wooden flower press;
- clean scissors;
- tweezers for lifting the finished flowers;
- labels or pencil for dates and flower names;
- a dry table where the press can remain undisturbed.
Skip waxed paper because it holds moisture in. Heavily textured paper towels can emboss their pattern into soft petals. The University of Maryland Extension pressing guide recommends absorbent papers and warns that plant pigments may stain book pages, so protect any book you care about with extra clean sheets and cardboard.
The complete flower-pressing method
1. Choose the bloom before it starts to decline
Pressing records bruising, translucent spots, torn petal edges, and the bloom’s stage of life along with its beauty.
Choose flowers when they are open enough to show their character but not yet fully mature. If you are cutting from a garden, wait until surface moisture or dew has evaporated. For a delivered bouquet, select the keepsake flowers while they still feel firm and look clean.
Naturally flat or single flowers are the easiest whole-bloom candidates: pansies, violets, cosmos, daisylike flowers, small sprays, ferns, and slim leaves. The University of Florida IFAS preservation guide notes that thick or double flowers may mold before their centers dry.
My rule is simple: if the center feels bulky, edit the flower before it enters the press. Use individual rose petals, a side profile, or carefully separated sections instead of asking one dense head to dry through several compressed layers. Remove prominent pollen-bearing stamens from lilies and alstroemeria so they do not stain the paper and petals.
2. Photograph and edit the bouquet
Before dismantling a sentimental bouquet, photograph it from the front and from above. That image preserves the original color relationships and gives you a composition reference later.
Then choose a small, intentional set:
- one or two recognizable flower faces;
- several petals from thick focal blooms;
- a piece of delicate foliage;
- a few small supporting flowers;
- any clean paper element, ribbon, or handwritten card you want to display nearby.
Trying to press every stem usually creates repetition and crowded packets. One carefully chosen petal beside the date and message can carry the whole story.
3. Build an absorbent packet
Place a flat piece of cardboard on the table, then add two clean absorbent sheets. Set each flower on the upper sheet with room around it.
Arrange the final face now:
- turn the bloom toward the angle you want to see;
- unfold petals that have tucked underneath;
- fan leaves away from the stem;
- curve a slender stem gently rather than forcing a hard bend;
- keep specimens from overlapping.
Lower another absorbent sheet over the flowers instead of sliding it across them. Add the second piece of cardboard. The packet should feel flat, stable, and easy to lift.
For an especially important bloom, make a second version in a separate packet. Flower pressing has natural variation, and a backup lets you choose the cleaner result.
4. Apply broad, even pressure
A weighted book and a purpose-built wooden press use the same essentials: absorbent layers, flat alignment, and sustained pressure. Illinois Extension describes both approaches in its flower-preservation guidance.
With a book: Place the protected packet inside a large book or directly beneath it, then stack additional heavy books on top. Use a stable stack on a dry interior surface. Do not put an unprotected flower directly into a valuable book.
With a wooden press: Center the packets between the press boards and tighten opposite corners gradually so pressure stays even. Tighten until the layers are held firmly and flat; crushing one corner harder than the others will distort the specimen.
Whichever tool you use, keep the press dry and leave it alone for the first several days. Constant lifting can move petals just as they begin to set.
5. Check once, then let the flower finish
Check the packet at about one week. Lift the top sheet slowly and look for three things:
- Damp or heavily marked paper: replace it with clean absorbent sheets.
- A shifted petal: correct it only if it still moves without tearing.
- A sour smell, fuzzy growth, or wet thick center: discard that specimen and do not return it to the press.
Reassemble the packet and restore the weight. University extension guidance gives roughly two to three weeks for complete drying, but thicker material and humid conditions can take longer. The flower is ready when it feels dry and papery throughout, not cool, soft, or flexible at the center.
6. Lift without breaking the edges
Remove the upper paper by peeling it back almost parallel to the table. If a petal clings, ease it free with tweezers or the edge of a clean sheet; do not pull from a stem and drag the flower across the paper.
Place the finished pieces on a clean, dry surface and inspect them before composing the keepsake. A cracked edge can often be hidden beneath another petal or the border of a mat. A browned center is better replaced than painted over if you want the piece to remain recognizably botanical.
How to keep more color and a cleaner shape
Color retention is decided mostly before and during the press, not by a finishing spray afterward.
Start with the right condition
A clean, near-peak flower generally presses better than one already softening in the vase. Surface moisture slows drying. Bruises often darken.
Match thickness to the method
Press slim faces whole. Divide dense flowers. If a rose matters, I would rather preserve six beautiful petals and one side profile than lose the entire head to a damp center.
Use smooth, absorbent layers
Smooth paper protects the petal surface. Absorbency moves moisture away. Waxed or plastic-coated material works against that goal.
Arrange before pressure
Pressure preserves the position you give it. A folded petal remains a folded petal; a carefully opened face becomes a deliberate silhouette.
Keep expectations honest
White may warm toward cream, pink may soften, and deep red or purple may become darker. Good technique reduces avoidable browning and distortion while the palette develops into the quieter character of a pressed flower.
Turn the pressed flowers into a keepsake
Do not wait until every bloom is dry to decide what the finished piece should say. Choose the format while the bouquet’s details are still fresh in your mind.
A frame that tells the story
Use the original bouquet photograph as a color reference, then arrange one focal flower, supporting petals, foliage, and a small written date. Leave negative space. Pressed flowers become more expressive when every fragment is not competing for attention.
A card or bookmark
Choose flatter, sturdier pieces and keep delicate edges away from the outer border. A single flower face can be stronger than a miniature bouquet.
An invitation or handwritten note
Mount flowers around the paper rather than covering the words that make it meaningful. If the original is irreplaceable, display a high-quality copy and store the original separately.
A labeled botanical memory
Add the date, occasion, sender, and flower names you know. If a name is uncertain, record the color and role instead: “small white supporting flower” is more honest than a confident wrong identification.
Keep finished pressed flowers dry and handle their fragile edges as little as possible.
What not to put in the press
Leave out:
- flowers that are wet, slimy, moldy, or visibly decaying;
- thick whole heads that cannot dry through the center;
- waxed paper or plastic film touching fresh petals;
- several overlapping flowers in one damp mass;
- a valuable book without protective paper and cardboard;
- a ribbon or card until you have confirmed it is clean and colorfast;
- the only irreplaceable bloom without photographing it first.
A flower press is wonderfully simple, but simplicity rewards precision. Select early, flatten with intention, give moisture somewhere to go, and wait until the specimen is truly dry.
If you want the next bouquet to become both a fresh gift and a future keepsake, Rosa Fiora can help you choose a design with beautiful pressable details.